I started this guy sometime ago and finished him up today. If you're not familiar with the pacman game characters this is supposed to be Inky, the blue ghost that chases pacman around in the game. Or at least I'll say that I tried to make it look like Inky. A little rough around the edges (because of the material I was using I had to sew around twice to make sure that it wouldn't fringe or open up, spilling out poor Inky's brains = cotton filling) and misshapen, but I think that that makes it cuter in a way. I don't know if I have a preference for any one of the ghosts in the game, though I've found myself making crafts with the blue and pink ghosts a lot. Considering that I guess that if I was to categorize myself into any pacman ghost fan club I would probably consider myself an Inky and Pinky member. Which ghost is your favorite? (the blue ghost is Inky, pink one Pinky, orange one Clyde, and I can't believe I don't remember the name of the last one but it's red!).
An odd title for a post yes, but that happens to be what I have to show for the time being: a golden purse and a napkin! And in no way related to each other! So shiny stuff first. The purse started out like a lot of other things on this blog, without embellishments. I found it at a thrift store and started sewing shinies onto it a couple of days ago. I had originally planned on using the purse's material for other crafting purposes, but since it wouldn't give me a whole lot of material I decided against it. Good choice huh? :-) And as for the napkin, I made it just like the ones featured on a previous post. I had a small bit of the fabric seen here, just enough to make one of 'em napkin dainties. I wasn't thrilled with pairing yellow or white ric rac trim to it like the other napkins though, and ended going a bit brighter and more colorful around the perimeter. Me likey! :-D
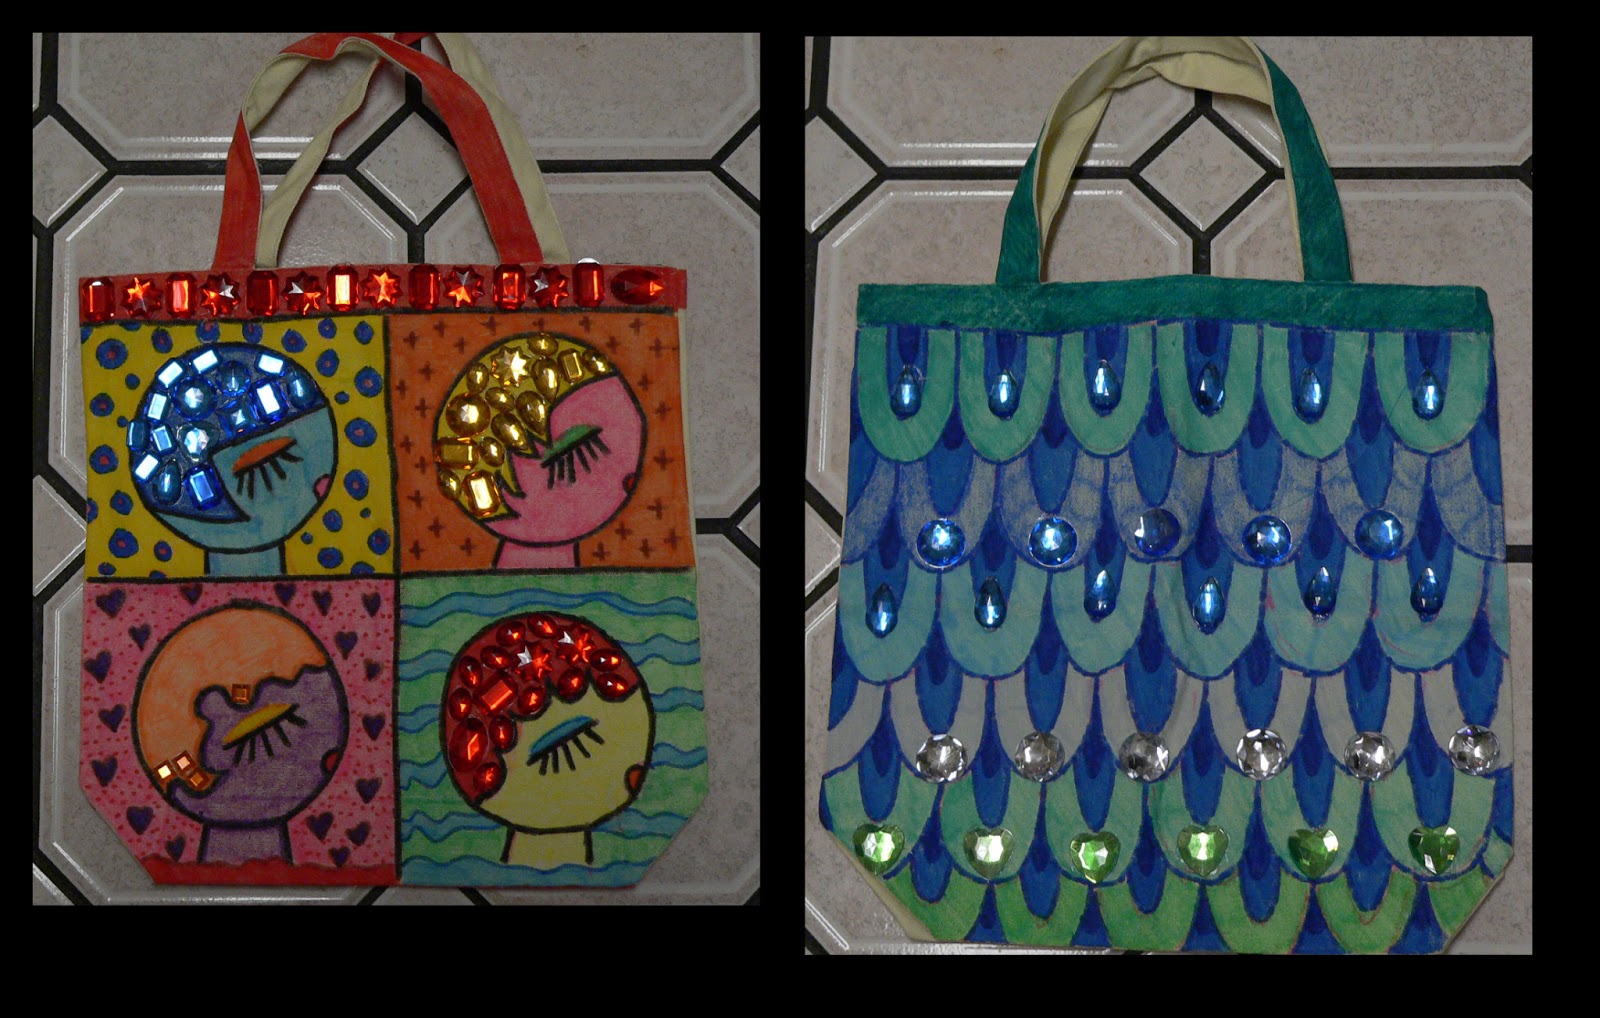
When it comes to craft, clothes or life in general, I have two sayings that I like to live by: You can't have enough green (my absolute favorite color) and you can't have enough bling. Shiny things really do have a way of complementing a craft, top, or just about anything that you have lying around. With that said, I thought that I would show some stuff that I have created and/or blinged out. If you've seen the previous posts featuring my dolls and the flower girls on this blog, then you'll recognize the faces on the colorful bag with the four girl faces. When I made that bag I was trying to emulate those Andy Warhol prints that feature portraits of celebrities in wild neon color combinations. My colors are a bit muted compared to those but no less fun, especially with the eye-catching gems on the girls' hair. The blue and greenish bag wasn't inspired by anything in particular. The day that I made that bag I had the colors green and blue swirling through my head and just had to get that out of my system. Looking at it now it kind of reminds me of those carp streamers that the Japanese put up to decorate poles on Children's Day(and previously on Boy's Day). The shapes sort of resemble the fish scales. As for the pink and red concoction that you see below, that started out as a plain magenta bag that I found at a thrift store some time ago. A pretty bag yes, but plain in the sense that it had no gems in sight. I thought that it would look a lot richer and more eye-catching with some (in this case turned into a lot) red gems sewn and glued on, and my instincts were right. Don't you just love the shiny? ;D The final picture that you see is of the purple top. That started out "plain" just like the pink bag and ended up having a bunch of acrylic flower gems sewn onto the collar. After seeing all of these examples, what do you guys prefer? Bling or no bling? :-)


Sorry for the lack of posts the past few days. I have some really cool pictures to show soon, so if you like what you've seen on the blog so far stay tuned! For the time being just look at the doggie and smile. His name is Argos (a.k.a. my furry little brother/son) and he is such a sweetie pie. I think that he was smiling at me like this while I was taking pictures for this blog. ;D Maybe he liked the stuff I made too :-).
It was some time ago while browsing on the internet that I came across pictures of handmade crafts like these: small cloth napkins with trim. It might have been a Martha Stewart idea... Anywho it seemed a cute and simple decorative item to have, so I too joined the make-your-own napkin dainties bandwagon and these are the results. It was a lot of fun mixing and matching ric rac trims with fabrics that I had; very relaxing sewing on the trim as well I might add. Very nice things to make if you're planning on having guests over, say for a brunch or tea.Well...maybe not that fancy! :-D
This furry thing I put together this morning. I spotted these fuzzy pink earmuffs in a thrift store at the beginning of the week and immediately thought that I could take off the fuzzies and create a little vanity item: a powder puff! All I did was take off the fuzzy stuff from the earmuffs and sew them together with a little stuffing in between so that it would appear even puffier than it already is. I also sewed a bit of ribbon and plastic pearl trim on top to give it that last finishing touch. I thought it'd be cute and funny to make my own pretend ad to go with the item, so you may now refer to it as The Pretty Puff! If I had more earmuffs then I would try to make them in different colors. A simple enough craft that shows you a way that you can reuse items that you come across: either lying about in your house or if you chance upon one in a thrift store!:-)
This drawing I created several years ago. It was originally an experiment with water colors that turned into a watercolor painting onto which I added some extra touches with oil crayon pastels. (That's actually what I end up doing with a lot of my paintings; paint with watercolors or acrylics and draw over with crayons or pastels.) The picture is supposed to be of a fence with sunflowers during the evening time when the sun is setting and casting a beautiful reddish pinkish glow in the sky. I find the colors to be very soothing so it's a nice relaxing thing to look at from time to time. :-)
I promised a part 2 of pacman awesomeness and here it be! The first picture is of a yellow handkerchief that I styled to be all ms. pacman-like. After sewing the ribbon trimming around the perimeter I got to a bit of embroidery, stitching the outlines of the character shapes and then tracing over them a bit with fabric marker. I filled the ghosts, ms. pacman bow and lips, and white orbs with marker. The next picture is of an apron that I made with a blue ghost (Inky) theme. I plan on making a whole series of these aprons, one for each ghost featuring different fruits or veggies in the background. The canvas apron I started out with was pure white so I had to color the whole thing over with marker twice to give it a finished look. I also added a blue ribbon trim around the edges to make it more dainty (can see it more clearly in the close-up), and the pearls at the top are there to add a little fashion jewelry statement. No reason why you can't cook with your favorite string of pearls attached! The last of the three crafts will most likely serve as a wall hanging. It was the simplest of the three things I made, mainly involved putting together various things that I had lying around in my craft supplies stash. I got the idea to make my own ms. pacman after spotting a felt circle at Wal Mart. The most labor intensive part was cutting out the wedge out of the right half to give her her characteristic open mouth. After that it was just a matter of gluing things into place (eyelashes and bow). The lips get their bright cherry redness from a tube of fabric paint.
I have another pacman craft that I am currently working on but it's in its rough-looking incomplete stage so I'm not showing it just yet. So if you liked parts 1 and 2 then you can also look forward to there being a part 3 in the future! Maybe by then I will have another ghost themed apron to show as well. :-)

These guys are not as recognizable as pacman but they're super cute and the Commander Keen games behind them are lots of fun. They're not really arcade games, more of a run, jump and shoot at monsters kinda deal. All of the games feature a little boy named Billy Blaze, a super genius who travels to distant planets on his handmade rocket ship made out of bean cans and various scrap parts. The creatures that you see on the totes below are from the very first game in the series, Marooned on Mars. The aliens in that game include the green ones with one or two eyes that you see below, along with wolf man type creatures, venus flytrap things that can eat your character, a robot butler, and another robot thing that shoots at you. The back of the one eyed alien bag features some of the items that you can collect in the game to earn extra points. The pinkish thing on the top right is that venus flytrap thing I was talking about. These bags were a lot of fun to make though a bit time consuming. The time consuming part was tracing out the blocky aliens onto the totes. To do that I printed out enlarged pictures of the aliens, laid them against the totes, and traced out all of the lines with a pencil. I didn't cut out a stencil or anything like that, so to make these images I had to literally push hard on the paper with a pen and pencil and hope that most of the lines would show after I removed the paper. Parts did and parts didn't, so I'd say that about 65% was visible to me and the rest I had to draw by hand referring to the pictures. The results were definitely worth the effort though and these bags really are the kinds of unique accessories that get comments. For any craft to be successful I think that the key is to just try and make something that you really like. For me its all things colorful, cute and filled with patterns!
P.S. The blue thing that you see attached to the first bag was not handmade by me. It's just a blue star crayon key chain that I found and added to accessorize. :-)
This is going to part numero uno of the pacman (or maybe more accurate to say ms. pacman) crafts created by moi that will be featured on this blog. Among some of the things that I like to collect are pacman collectibles (whenever possible). I add the whenever possible bit because unless you're a regular internet shopper or have a good vintage goods store nearby, pacman items can be really hard to come by. Hard to find or not though I appreciate all things pacman related and naturally want to create my own waka waka items. The Ms. Pacman t shirt that you see below is actually the first thing I ever made with fabric markers. After making that I was addicted and started brainstorming other pacman crafts. The second t shirt that I thought of making ended up being the cute little "I'm Shy" one. Nobody ever approached me with comments about it but several people looked at it with an amused smile when I wore it out this one time..... And the last two things I've made that I will show for the time being are the framed pink lovelies. The frames were actually originally mirrors that had a white painted wooden border. I painted the wood pink to be more colorful and glued my own handmade pictures of Pinky (the pink ghost)and ms. pacman. For some final touches I painted the rim around the pictures red and added a bit of glitter here and there for cosmetic touching up. And there you have it! Fun right?! :-D I have several more pacman crafts on the go so if you are like me and appreciate the cute colorful characters of vintage arcade games then stay tuned for a part 2!
P.S. I forgot to say add one last little note. If you're confused by the writing on the ms. pacman shirt at all it's because it's written in Japanese katakana (it's the alphabet Japanese people use for writing our foreign words and names). It basically reads the same though so what you see there is the katakana version of ms. pacman. ;D


