 Given the decent amount of potpourri that I have lying around I wanted to create some sort of scented decorative item. I wasn't too excited about the idea of stuffing up one of those little fabric baggies that they sell at stores. I wanted to design and create something of my own, something different looking that appealed to my color and patterns aesthetics. What you see pictured here is the product of my recent efforts. I basically created the entire fabric ornament with plastic pearl embellishments and then stuffed it with cranberry orange scented potpourri. I've been experimenting with different shapes and colors lately and I like my take on the potpourri satchel idea quite a bit. I plan on creating more of my colorful "satchels" to hang around the house. When creating and brainstorming these I take part of my inspiration from the long flowing Japanese Star Festival decorations. If you've never heard about the Japanese Star Festival then it's definitely worth a quick internet search. The decorations are just beautiful!
Sunday, December 30, 2012
I Smell Potpourri!
Given the decent amount of potpourri that I have lying around I wanted to create some sort of scented decorative item. I wasn't too excited about the idea of stuffing up one of those little fabric baggies that they sell at stores. I wanted to design and create something of my own, something different looking that appealed to my color and patterns aesthetics. What you see pictured here is the product of my recent efforts. I basically created the entire fabric ornament with plastic pearl embellishments and then stuffed it with cranberry orange scented potpourri. I've been experimenting with different shapes and colors lately and I like my take on the potpourri satchel idea quite a bit. I plan on creating more of my colorful "satchels" to hang around the house. When creating and brainstorming these I take part of my inspiration from the long flowing Japanese Star Festival decorations. If you've never heard about the Japanese Star Festival then it's definitely worth a quick internet search. The decorations are just beautiful! The Sketching Phase
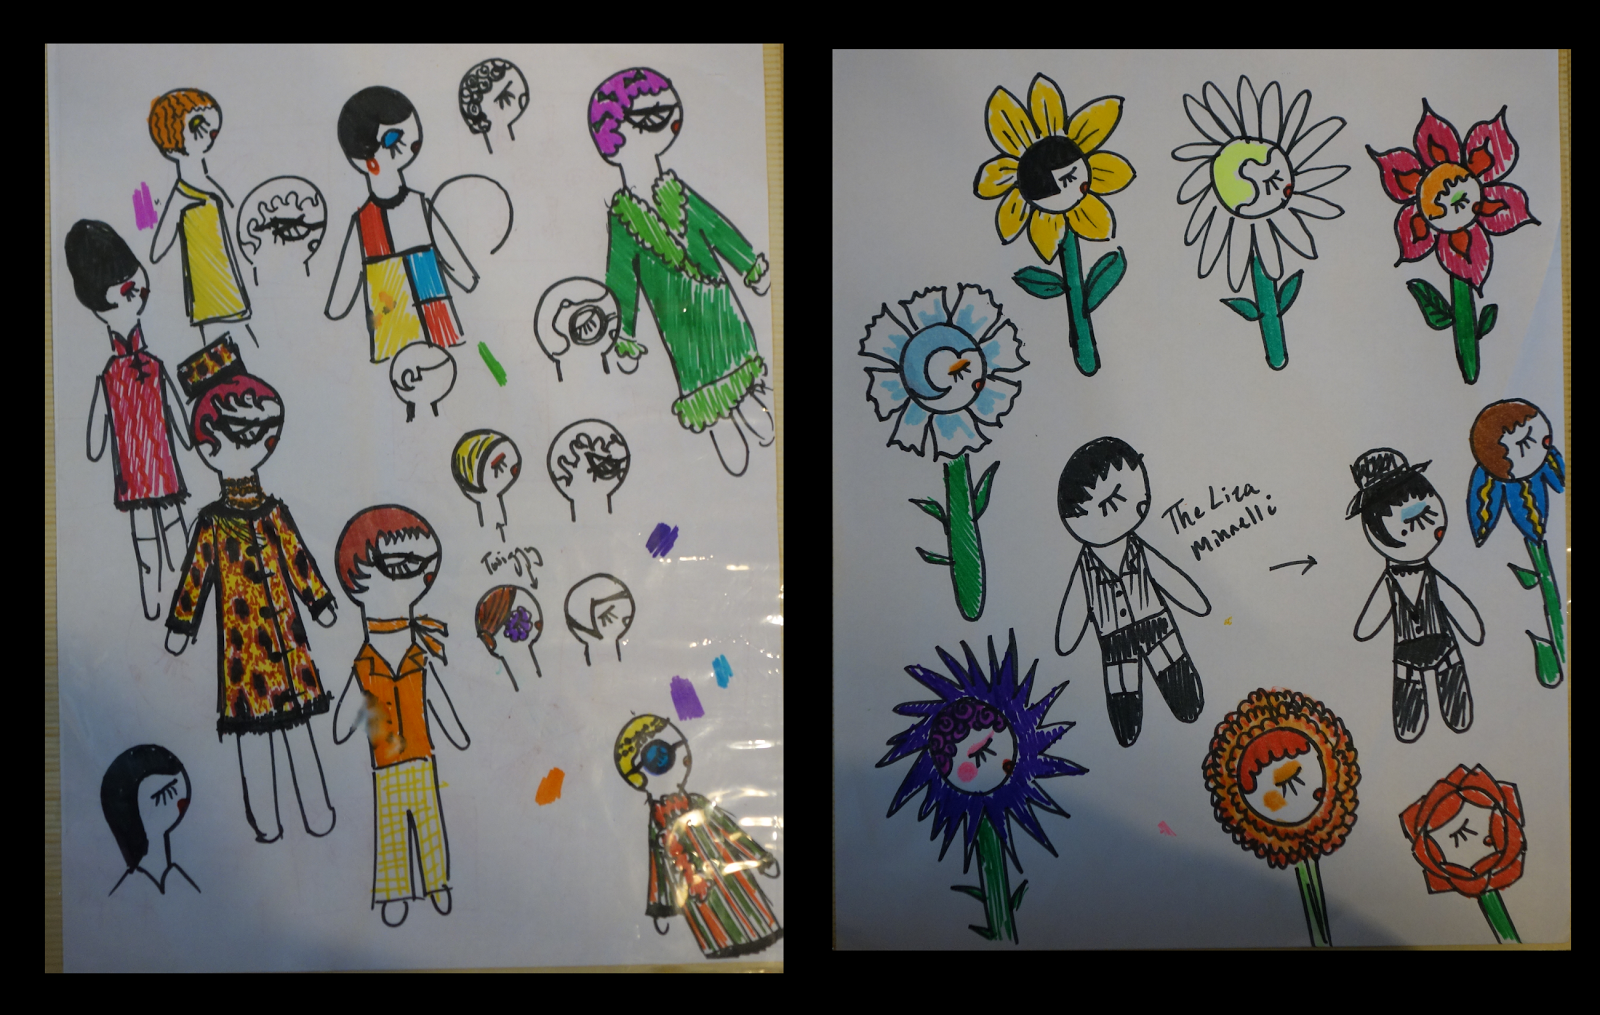
All creations start with an idea, and most of my ideas come in the form of child-like doodles. Often-times I just draw whatever comes to mind out on paper with pen without coloring it, adding in notes here and there on the colors that I am thinking about. If I become devoted enough to one of my ideas though, I'll usually outline my original doodles and add a little color so that I can compare the idea with the actual product and also just to make it look fancier and legit. I've thought of many different looks for the dolls that I make, some of which I've sketched as such and posted below. One thing that is of course missing in my previous selection of dolls is glasses! I especially love the cat-eyed glasses of the 50s and 60s so my girls gotta be wearin' those! And of course the hair colors and lengths can be experimented with. I plan on sewing in play hair extensions in my dolls' heads so that some of the future ones I make will have longer hair that can be styled into updos and pony tails. It might sound a bit silly and frivolous but when you come up with an idea that you really like it's so much fun brainstorming the different possibilities! Below are sketches/doodles that I've filled up a scrapbook with over the past months with ideas of things that I have created or have yet to create. Recognize some of the flower girls? :-)


Saturday, December 29, 2012
Doll Face ;D
These little ones have a bit more of a story behind them than the other things I have posted so far. If you saw the flower power post you will notice that the faces are very similar to those of the flower girls. I actually made the flower girls after I made all of these dolls. I haven't finished outfits for all of them but I have plenty of ideas. But back to the story! The one that really started it was the unclothed doll at the very bottom with the black bobbed haircut. Years before even thinking of making these girls I had been doodling in my notebooks for some time with this little cartoon character I had created. The character was inspired by my most favorite silent film actress: Louise Brooks. I loved her hair and her 20s flapper style, and wanted to recreate that in some way. I think that it was basically one day while taking notes in Calculus III that I came up with the little girl, doodling her by my equations. And the rest is just history! After creating the doll that looked just like my doodle of math classes past, I thought that the basic design (very simple but cute) could be easily made with other hairstyles, colors and clothes. That's where the redhead (one in the green dress), the blond, and even the blue haired one came into being. I love fashions of the 1960's and 1920's, so my dolls have been styled for both eras. The redhead doll for instance was given a 20s/30s short curled hairdo, but the dress just screams 60s. The tanned one is the most 20's out of all of them. She's supposed to be sort of a 1920's beach babe. Her swimsuit I made to look like a swimsuit that was sketched by Sonia Delaunay, and her hair I tried to make a little Josephine Baker-like. The outfit on the blond doll is also very 60s. It was during one of my internet browsing expeditions that I spotted a 60s dress with that combination of colors that I liked a lot. The dress is more or less the same as that one. And though not completely clothed the other redhead doll with the green eyeshadow has what I consider to be a very special garment on. The purple and pink shawl that she is wearing required a bit of creativity. I started by cutting a strip of white fabric and coloring it purple with my fabric markers. Then I got several purple and pink pipe cleaners and stripped them of their fuzzy. I patiently glued the fuzzy onto the strip of fabric, and while the glue was still wet draped it around her teeny shoulders. Once it dried it was perfectly molded into a shawl shell-like thing that can easily be put on her or taken off while maintaining its shape.
And that's about it! I've sketched lots of other ideas for dolls but haven't gotten around to creating them yet. Perhaps in future posts I'll show some of my doll doodles to give you an idea of where the whole creation process begins. I actually follow my sketches pretty closely as you will see. And as sort of a sidenote it is not a doll but I wanted to include a picture of it. You see the yellow and black polka dotted purse? That was just a small little project of mine that was quite easy. The purse was originally white with black polka dots. That was fine and all but I thought that it would look much more exciting if it were yellow. So.....(after reading my posts you can probably guess what I thought of doing) I whipped out the old fabric markers and colored it yellow! Fabulous!!!! :-D Anywho, hope you liked the dolls!

And that's about it! I've sketched lots of other ideas for dolls but haven't gotten around to creating them yet. Perhaps in future posts I'll show some of my doll doodles to give you an idea of where the whole creation process begins. I actually follow my sketches pretty closely as you will see. And as sort of a sidenote it is not a doll but I wanted to include a picture of it. You see the yellow and black polka dotted purse? That was just a small little project of mine that was quite easy. The purse was originally white with black polka dots. That was fine and all but I thought that it would look much more exciting if it were yellow. So.....(after reading my posts you can probably guess what I thought of doing) I whipped out the old fabric markers and colored it yellow! Fabulous!!!! :-D Anywho, hope you liked the dolls!
Who Let The Dogs Out?!! :-D
This is what I would like to consider my first plushy creatures posting. As with most of the crafts I've posted so far they were made with blank white fabric that I then colored with fabric markers. I was inspired by the cute wide eyed eyelashed stuffed animals of the sixties when making these. The two green dogs that you see in the pictures are actually two sides of the same dog. The bright pink one is pink all over though. In total I've made four of these dogs so far and have found that they make really terrific gifts. Everyone I've shown the dogs to loves the tails. They were too thin to stuff with cotton and sew like the rest of the dog, so I filled the tails up with a couple of pipe cleaners. So another plus side to the little plushies is that their tails are bendable. Just as expressive as real dog tails!

Wednesday, December 26, 2012
Revamp things Craftista Style!
Some of my more fashion-oriented readers will most likely appreciate this posting as it has to do with glitzing and glamming clothing and accessories. Adding a few gems here and several buttons there can really make a big difference in you fashion items, transforming things from blah to gaga :-). Both of the cardigans shown below used to be plain and green (nothing wrong with that....green's my favorite color!) but loving all things shiny I just had to embellish, and what you see in the pictures is the result of my hand-sewn acrylic and button embellishing. The purse pictured in the far right corner definitely required a lot more patience and quite a few acrylic gems I might add. ;D That purse used to be white all over, but loving all things green I wanted to make it into my own dream purse. So I colored it with a green fabric marker and then hot glued as many gems as could fit on both sides. I still have to take care of the bottom of the purse and the handles to make it more finished, but even as it is now it's definitely an attention getter!
The only things that are not green are the somewhat smaller pictures of what look like blue cuff things. That was a little fun frivolous project of mine that I decided to make out of all of the blue scraps and things that I had lying around. It's meant to be a corsage. What I did to make it was several things. The flower part I made out of left over lace trims. Patiently folding and sewing layer after layer of the lace gave it that nice puffy effect. I stuck a few beads into the middle of it and added some glitter all over to give a quick cosmetic touch-up. The part of the corsage that goes around the wrist I believe I made out of some sort of thick elastic. It was blue which of course was convenient, and onto that I just sewed whatever else I had left: buttons, gems, beads, lace, and of course a coat of glitter! It was a lot of fun to make and I personally think that it is super cute. Great to make for parties, proms, or just to wear out in general. :-)
A quick note I might add before ending this post is that you don't have to just embellish with beads and buttons! Get creative and try other things! I haven't finished it yet so I will not post it until it is more presentable, but idea-wise I can tell you that another fun way to embellish stuff is by using leftover craft flowers. I'm talking about those fake flowers that you'll find in stores that have the plastic stems and the fabric petals. Since the petals are made out of perfectly fine material you can just pull them off of their stems and sew them onto your clothes and accessories as embellishments. I am currently sewing a bunch of tiny white flowers to make a collar for a black cardigan of mine. Like the green purse it requires more patience but the results are definitely worth all the effort! Have fun thinking up your own ways of fabulizing your wardrobe! Stay tuned for more posts and keep crafting. ;D
Sunday, December 23, 2012
Flower Power!
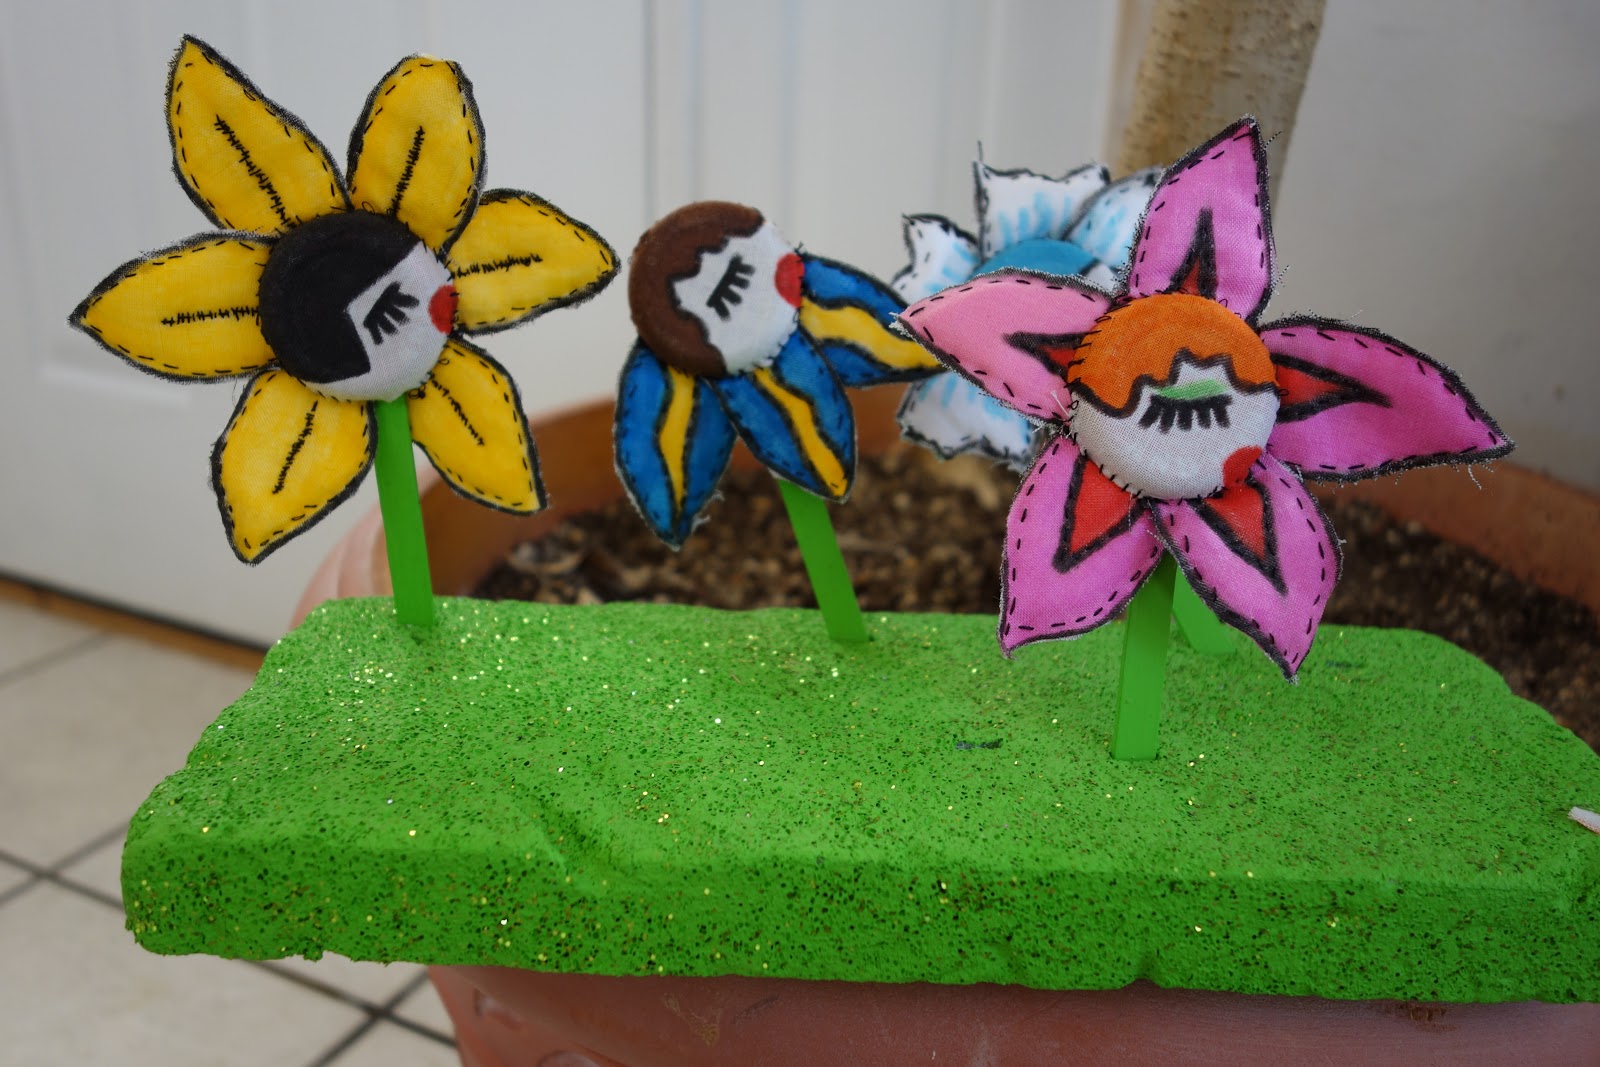
Besides creating things from store bought craft goods like beads, clay, paints, fabrics,..etc., I also really enjoy converting so-called junk items into cool and pretty things. A case in point is bottle caps. They're not the most junky things you can find, though a lot of people simply toss away their bottle caps whenever they finish drinking a bottled beverage. I've gotten into the tendency of doing the opposite as of late though because of all of the neat things I can use them for. Even if you're not in the mood to actually create something out of a bottle cap per se, you can still use bottle caps and just any objects with a circular base for tracing out circles. All of the pillows with the large polka dot circles in the previous post had their circles traced out with snapple bottle caps. It sure beats trying to draw out your own perfect circles! (though there is a charm to the less balanced ones...)But if you are in the mood to get really crafty, then you can try something like these flower girls that I made to look like my dolls (not yet posted....will be in the near future!) The dolls I make aren't actually flowers but their faces are the same as the ones painted on the flower girls below. So how did I make the flower girls? First I covered a couple of bottle caps with cloth and painted the faces on them with my fabric markers(again with the fabric markers!). Then with the same markers I drew out petal designs on white cotton and padded them with felt to make little quilted flower petals. The stems are just regular popsicle sticks that I painted green. Finally I sewed the two bottle caps (two sides of the flower girls' faces) together, inserting petals here and there. I didn't sew all the way around though as I had to leave a small opening space for the stems. Once I stuck 'em stems in they were done! I wanted to make my own little garden of them so I also painted a styrofoam rectangle green and covered it with green glitter. The girls stuck right in! So I guess that besides fulfilling any of your needs to create you can also ensure that you will have happy flowers all year round with these guys. ;D It might also be a cute decoration to have for a party!!!!

Saturday, December 22, 2012
Some Home Decor For the Craftista


First Posting!!! :-D
So here it be! Mine first blog post for the Joys of a Craftista! Every since I was a little girl I have loved dabbling in the arts and crafts: from scribbling in books with crayons, to making clay elephant sculptures in grade school to crochetting my own blankets in middle school, and well....creating everything else since then! Crafts have really become my passion over the past year. I take joy both in creating the things that I love, but also in sharing them. I've created quite a few things by now, and so with previous thought in mind figured....why not start to share them? So without further ado, let me introduce you to some of the things that I create! :-)
What you see below are some pictures of totes that I have been focusing on craft-wise. Basically all I do is buy a box of blank tote bags from Wal Mart, a package or two of fabric markers, and then just draw and fill in! I happen to love all things sparkly and blingy though, so in my mind some of the bags were not complete without acrylic gems added; hence the gems on some of 'em.


If you look closely at the orange, yellow and green one you will probably notice what look like little faces. That bag was inspired by some pictures of microorganisms I spotted online. The green things were supposed to be paramecium but most people who see them think that they're pickles so I just go with that. The small blue and purple circles on the other hand I do believe to resemble cells.

What you see below are some pictures of totes that I have been focusing on craft-wise. Basically all I do is buy a box of blank tote bags from Wal Mart, a package or two of fabric markers, and then just draw and fill in! I happen to love all things sparkly and blingy though, so in my mind some of the bags were not complete without acrylic gems added; hence the gems on some of 'em.
If you look closely at the orange, yellow and green one you will probably notice what look like little faces. That bag was inspired by some pictures of microorganisms I spotted online. The green things were supposed to be paramecium but most people who see them think that they're pickles so I just go with that. The small blue and purple circles on the other hand I do believe to resemble cells.
And apart from the bag I just talked about the only other one that's supposed to kind of resemble something from real life is the red and green one to the very left. I've been doodling red circles with black X's in them for a while imagining that they were roses, but to really make the idea clear that they are supposed to be flowers I added the stems and lines to resemble grass. And that's really about it for the time being! I have lots more things to take pictures of including pillows, dolls, placemats, stuffed animals, and flowers! Hope you enjoyed the bags and their bling and colors! :-) Keep Crafting and stay tuned for more updates!
Subscribe to:
Posts (Atom)